


 Now you can get the latest Java source bundled with each app update. Install the app from Google Play and go to Settings > Extras.
Getting started with Google Maps API for Android
 Download
Keywords: Google Play services SHA-1 fingerprint Google APIs Console Maps API key GoogleMap CameraPosition CameraUpdate Marker GroundOverlay UiSettings SupportMapFragment
Contents- Overview
- Integrating Google Play Services
- The SHA-1 fingerprint
- Create an API project
- Obtain a Google Maps API Key
- Create a new Eclipse Android project
- The Android Manifest file
- The Layout file
- The Main Activity
- Camera Position
- UI Settings
- Marker
- Ground Overlay
- Scroll
- What's next?
6. Create a new Eclipse Android project
In Eclipse, go to File > New > Project and in the New Project dialog, expand Android folder to select Android Project.In New Android Project dialog enter the project details as follows.
Application Name: Maps Overlay
Project Name: MapsOverlay
Package Name: appsrox.example.mapsoverlay
Minimum Required SDK: API 8
Compile With: API 8
Accept the defaults and click Next, Next, Next, Finish. The project gets created in your workspace.
Next we need to add google-play-services_lib project as a library to our project. Right click on the project and go to Properties > Android.
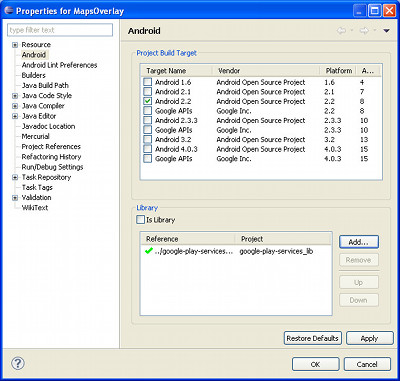 In the Library section, click Add and then select google-play-services_lib and click OK. This will add google-play-services_lib as a library to the project and we can use the Maps API.
7. The Android Manifest file
The official documentation specifies few permissions and feature required to use Google Maps Android API v2. Add the following lines to the manifest.
	<permission
	        android:name="appsrox.example.mapsoverlay.permission.MAPS_RECEIVE"
	        android:protectionLevel="signature" />
	<uses-permission
	    android:name="appsrox.example.mapsoverlay.permission.MAPS_RECEIVE" />

	<uses-permission android:name="android.permission.INTERNET" />
	<uses-permission android:name="android.permission.ACCESS_NETWORK_STATE" />
	<uses-permission android:name="android.permission.WRITE_EXTERNAL_STORAGE" />
	<uses-permission android:name="com.google.android.providers.gsf.permission.READ_GSERVICES" />

	<!-- Required if user's location is accessed -->
	<uses-permission android:name="android.permission.ACCESS_COARSE_LOCATION" />
	<uses-permission android:name="android.permission.ACCESS_FINE_LOCATION" />

	<uses-feature android:glEsVersion="0x00020000" android:required="true" />
Notice that we create a new permission appsrox.example.mapsoverlay.permission.MAPS_RECEIVE. Do not forget to change the package name if you are using a different package for your application.
Next add a <meta-data> to the <application> element to specify the API key. Also we would like to make the activity full screen.
    <application
        android:allowBackup="true"
        android:icon="@drawable/ic_launcher"
        android:label="@string/app_name"
        android:theme="@android:style/Theme.NoTitleBar.Fullscreen" >
		<meta-data
		    android:name="com.google.android.maps.v2.API_KEY"
		    android:value="YOUR_OWN_KEY"/>

        <activity
            android:name="appsrox.example.mapsoverlay.MainActivity"
            android:label="@string/app_name" >
            <intent-filter>
                <action android:name="android.intent.action.MAIN" />
                <category android:name="android.intent.category.LAUNCHER" />
            </intent-filter>
        </activity>
    </application>
Do replace YOUR_OWN_KEY with the one you obtained earlier through the Google APIs Console.
8. The Layout file
The layout of the application is a RelativeLayout containing a fragment for the map and two image views which act as an overlay over the map.<RelativeLayout xmlns:android="http://schemas.android.com/apk/res/android" android:layout_width="match_parent" android:layout_height="match_parent" > <fragment android:id="@+id/map" android:layout_width="match_parent" android:layout_height="match_parent" class="com.google.android.gms.maps.SupportMapFragment" /> <ImageView android:layout_width="wrap_content" android:layout_height="wrap_content" android:layout_centerHorizontal="true" android:layout_centerVertical="true" android:paddingTop="50dp" android:paddingLeft="20dp" android:src="@drawable/shadow" /> <ImageView android:layout_width="wrap_content" android:layout_height="wrap_content" android:layout_centerHorizontal="true" android:layout_centerVertical="true" android:src="@drawable/plane" /> </RelativeLayout>
Note that we use SupportMapFragment instead of MapFragment since we have specified the minSdkVersion in the manifest as API 8.
Ensure that Android support library is added to the project so that we could use Fragments in our application. Otherwise follow the instructions given here.9. The Main Activity
Here is a basic outline of the MainActivity. We'll add more code to it as we implement more features.
	public class MainActivity extends FragmentActivity {
		private GoogleMap mMap;

		@Override
		protected void onCreate(Bundle savedInstanceState) {
			super.onCreate(savedInstanceState);
			setContentView(R.layout.activity_main);

			setUpMapIfNeeded();
		}

		@Override
		protected void onResume() {
			super.onResume();

			setUpMapIfNeeded();
		}

		private void setUpMapIfNeeded() {
			if (mMap == null) {
				mMap = ((SupportMapFragment) getSupportFragmentManager().findFragmentById(R.id.map)).getMap();
				if (mMap != null) {
					setUpMap();
				}
			}
		}

		private void setUpMap() {
			// TODO configure the map
		}
	}
We follow the pattern used in the maps sample provided by Google Play services SDK. This ensures the map is setup only once if it is available i.e Google Play services APK is installed.
10. Camera Position
Add the following lines of code to configure the camera position.
	private static final LatLng NEWARK = new LatLng(40.689870000000000000, -74.178209999999980000);

	private static final CameraPosition POSITION =
			new CameraPosition.Builder().target(NEWARK)
					.zoom(17)
					.bearing(320)
					.tilt(30)
					.build();

	private void setUpMap() {
		mMap.moveCamera(CameraUpdateFactory.newCameraPosition(POSITION));
	}
In the code we specify configuration parameters such as target location, zoom, bearing, and tilt. This sets the location and viewing angle of the camera.
11. UI Settings
Additionally, we can specify UI settings to the map.
    private UiSettings mUiSettings;

    private void setUpMap() {
    	mMap.setMyLocationEnabled(false);

    	mUiSettings = mMap.getUiSettings();
    	mUiSettings.setZoomControlsEnabled(false);
    	mUiSettings.setCompassEnabled(true);
    	mUiSettings.setMyLocationButtonEnabled(false);
    	mUiSettings.setScrollGesturesEnabled(false);
    	mUiSettings.setZoomGesturesEnabled(false);
    	mUiSettings.setTiltGesturesEnabled(false);
    	mUiSettings.setRotateGesturesEnabled(false);

		// rest of code
    }
Modify setUpMap() method as shown above to further configure the map as to what functionalities are available to the user. This can be done in the layout as well e.g.
	<fragment xmlns:android="http://schemas.android.com/apk/res/android"
		xmlns:map="http://schemas.android.com/apk/res-auto"
		android:id="@+id/map"
		android:layout_width="match_parent"
		android:layout_height="match_parent"
		android:layout_margin="5dp"
		class="com.google.android.gms.maps.SupportMapFragment"
		map:cameraBearing="112.5"
		map:cameraTargetLat="-33.796923"
		map:cameraTargetLng="150.922433"
		map:cameraTilt="30"
		map:cameraZoom="13"
		map:mapType="normal"
		map:uiCompass="false"
		map:uiRotateGestures="true"
		map:uiScrollGestures="false"
		map:uiTiltGestures="true"
		map:uiZoomControls="false"
		map:uiZoomGestures="true" />
12. Marker
We can add a Marker at any position on the map along with title and snippet. Moreover, we can customize the icon displayed. Add the following code in the setUpMap() method.
	Marker flag = mMap.addMarker(new MarkerOptions().position(NEWARK)
			.title("Newark")
			.snippet("Airport")
			.icon(BitmapDescriptorFactory.fromResource(R.drawable.flag)));

	//flag.showInfoWindow();
This is how a green flag is shown instead of the default marker icon. You may further call showInfoWindow() on the marker to show the info programmatically.
13. Ground Overlay
We can create an overlay on the ground at a desired position which has the benefit that it adjusts based on the camera position, zoom, tilt, bearing, etc. We used ground overlay to show an arrow image (next to the flag) on the map.
    private GroundOverlay mGroundOverlay;

	mGroundOverlay = mMap.addGroundOverlay(new GroundOverlayOptions()
			.image(BitmapDescriptorFactory.fromResource(R.drawable.arrow))
			.anchor(0, 1)
			.position(NEWARK, 50f, 50f));

	mGroundOverlay.setTransparency(0.1f);
14. Scroll
The API allows you to scroll the camera by desired number of pixels. We use this feature to create an effect of a moving airplane.
	private static final int SCROLL_BY_PX = 10;

    private CancelableCallback callback = new CancelableCallback() {

		@Override
		public void onFinish() {
			scroll();
		}

		@Override
		public void onCancel() {}
	};

    private void scroll() {
        if (mMap == null) {
            return;
        }
		mMap.animateCamera(CameraUpdateFactory.scrollBy(SCROLL_BY_PX, -SCROLL_BY_PX), callback);
    }
Put a call to scroll() method in setUpMap(). Further, we invoke scroll() in the callback which creates a loop and causes the map to scroll repeatedly.